Pages

Friday 31 December 2010

Last Christmas Card

Heres the last Christmas card I made.  I cant believe its over for another year...

I ran out of cards and as usual struggled for inspiration. But thankfully remembered that I had lots of swaps on my display boards from demonstrators I have met over the last few months.  The inspiration comes from a swap done by Carol, who I understand CASEd it from a card made in September by DianeP on the In Love With Stamping gallery.  Heres the link to the one Diane did and her blog is http://craftwithstyle.blogspot.com/.  Thanks Amanda for reminding me who made the swap!


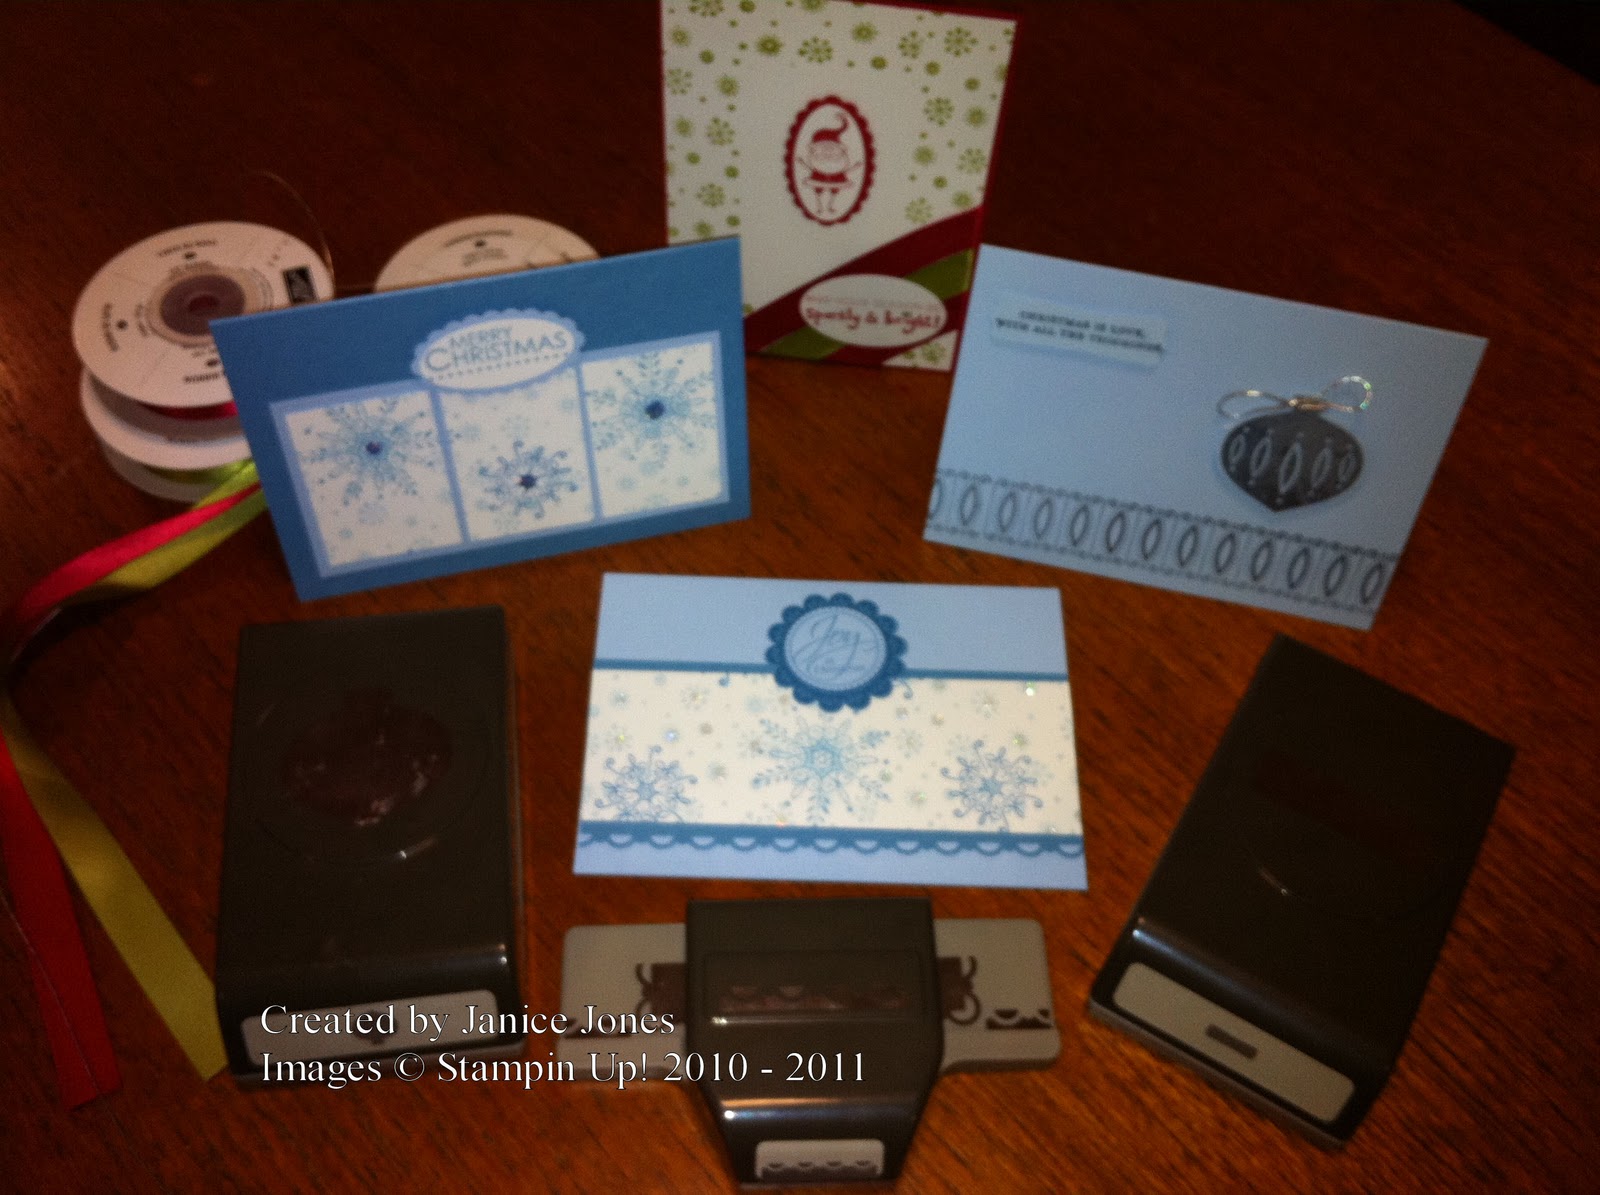
I coloured some Platinum Shimmer Paint with Not Quite Navy ink from my reinkers, applied it to the circle image with a sponge dauber and stamped onto Whisper White card.  Then I stamped the oblong star eight times around the circle in Marina Mist ink.  The spacing was so easy with the clear mount sets - I didnt have to do any measuring and they are almost evenly spaced!

As the sponge dauber was still loaded with the blue shimmer paint (and I didnt want to waste it!) i went around the edges of the card in a stroking motion to apply the paint to the outside edge.  This didnt quite work on the first few I made, but as I the ink became less heavy and I got the hang of the effect I wanted, it did look better.

To decorate the star I used one of the large brads from Hodgepodge Hardware in the centre and some basic rhinestones (boy, do these sparkle!) before wrapping the ribbon around the card.  The ribbon was just Whisper White 3/8 Grossgrain which I dyed - again using reinkers in Not Quite Navy. Another brilliant way of colour coordinating everything from SU.

The star topper was just matted and layered in Not Quite Navy and Marina Mist, applied to the card blank and the sentiment added.

The reinkers came in really handy with this card.  At first, I just wanted to colour the Shimmer Paint - it was only as I was layering the star and the mats of card up that I realised that we dont have any Not Quite Navy ribbon (great planning there then!).  The ribbon came out very slightly lighter than the card (but it was such a slight difference, you could hardly tell).

Ok, thats my last Christmas Card post - for this year anyway.

Happy New Year Everyone - hope its a good one for you!!!

Take care
Jan

Thursday 30 December 2010

I hope that you have had a great time with your family and friends over the Christmas period.

Apart from having a really bad cold and cough its been a lovely Christmas for us.  My Mum and brother came over for Christmas Day lunch and then we went to DH Dads for tea. All the family in a two bedroomed flat (about 28 adults and loads of children!!!).  It was a bit like musical chairs though - if you went for anything to eat or drink, you lost your seat!

Santa brought me money this year as there are lots of things I would like to get from SU - wah hoo!!  I also bought a nice bracelet with some of the money (this was partly because DH was wanting me to get a bicycle with it - yer, right...!)

I was quite ill over Christmas and couldnt deliver some of the presents and cards until recently, and I didnt want to post any pics of the items I made before everyone had seen what they were getting.  As I delivered my last items yesterday, I thought I would share them.

Heres the mini calendar and note holder.  Yes, its using my favourate DSP - Lap of Luxury - its so nice, I just couldnt resist using it.  I also made these for each of my lovely Stampers 10 ladies (hope you liked them!?)


The acrylic holders were part of a share over at In Love With Stamping ages ago and I hadnt had much chance to use them.  The holders are designed to hold paper between the layers so I just cut the DSP to size and slid it in.  The pens were a little bit fiddly, but I loved how they looked when they were done.  I bought the little calendars from a local craft shop and they were just adhered to the front of the holder with post it notes attached to the back.

I struggled to find a way to hold the pens but the ribbon seemed to work OK.  For the ones at the front (using the narrow Grossgrain ribbon) I made loops of ribbon which the pen nib sits in.  Then I wrapped a strip of ribbon around the holder to hold the top of the pen.  The wider ribbon did work better though and I didnt need to do anything else to hold the pens as the ribbon is strong enough on its own.

Heres a photo of the back showing the post it notes attached to the rear of the holder.


The friends sentiment is from Tiny Tags and was mounted onto a scalloped oval stamped with Perfect Punches.


Sorry its taken so long to post photos of the holders.  I will post a picture of the last Christmas cards I made (not using a Christmas themed stamp set though!) in the next couple of days. 

Hope you are enjoying the Christmas period and thanks for bobbing over.
Jan
X


Friday 24 December 2010

Merry Christmas Everyone!

As I have a shocking cold I havent been able to do any crafting or pass on the cards and gifts I am wanting to post on here.  The last thing I want to do is pass on this horrible cold.

So, I just wanted to wish everyone a

Very Merry Christmas and a Happy New Year.

I will post pictures of the cards and other items as soon as I can.

Jan
x

Wednesday 22 December 2010

Serene Snowflakes

I think I am safe to post this now as most of my ladies have their cards.

Heres one of the cards I made for my past hostesses and some of my customers.


I got the idea from some Card Candy made by Sara here.

The snowflake paper was made using the one sheet wonder technique - covering a sheet of Whisper White cardstock with stamped images in different sizes and coordinated colours, here Night of Navy, Bashful Blue and Marina Mist inks.  Spots of Chrystal Effects were applied to the tiny snowflakes and Dazzling Diamonds glitter sprinkled on to give some bling.  Once this was dry I trimmed it to fit the card blank

A thin strip of Marina Mist card was punched using the scalloped edge punch and attached to the back of the snowflake card - it doesnt need a wide strip of card as most of it is covered.  The top of the snowflake card was covered in a strip of 3/8" Night of Navy Grossgrain ribbon and it was then attached to the card blank.

To make the large snowflake topper I stamped the large snowflake onto Whisper White card in Night of Navy ink and used my paper peircer and mat template to decorate the corners.  Then I stamped the large snowflake again with Versamark onto Night of Navy card and heat embossed with white embossing powder.  The main four large points of the snowflake including the centre were cut out and mounted with dimentionals onto the Whisper White topper and a large rhinestone brad put through the centre.  This was then mounted onto Marina Mist card and attached to the card blank, overlapping the snowflakes.

I have some more photos to share but they will have to wait as I wont get to see everyone before Christmas. 

There would have been more photos, but had a slight problem... I made lots more cards last week after running short.  I handed these out to some people at work on Monday, then realised that I hadnt taken any photos of them (DOH!).

Hope you are keeping warm and safe. 
Thanks
Jan
X

Monday 20 December 2010

Its coming too fast...

OMG how quick is Chistmas coming this year?

Sorry, but I cant show you any pics for anything as I have been frantically making cards & gifts for people and I havent delivered them yet!  I just wanted you to know I am still here and to promise that I will get some posted in the next few days.

Its been mad lately here - I even went to Meadowhell on Saturday - with Ian!  I refuse to go in December as it gets so mad near Christmas but I was gobsmacked at how quiet it was. I have seen it busier mid week!!! Ian refuses to go at any time but with the threat of snow lurking he said that he would come too (bless him).

Anyway, almost sorted for Christmas now - I hope you are too - just have to hope that all the pressies I have ordered on line for Ian come in the next few days.  Otherwise I may be out on Christmas Eve to get him something to open - Ahhhh.

Thanks for stopping by.
Jan
x

Friday 10 December 2010

Convention Blog Hop

Did I mention that I went to the Stampin' Up! Convention?  Tee Hee - sorry, I am still a bit giddy about convention!!! 

Just to prove we were there me, Sara and Joanne (my SU Mummy and Grandma) had our picture taken on stage.  I know, its not very often you see photos of me but I thought I would make an exeption!  We decided to each make a scrap book page as a momento and then have our own mini blog hop.

The blog hop will be live from 10.30am on Sunday 12th December - so if you try to view some of the links they may not be live. 

Hopefully, you have come here from Saras blog here.  I love how she has done hers A4 in size!

I used a 12x12" sheet of Elegant Eggplant as the base as it looked so nice near to Saras top.  The other colour I decided to use was Real Red - to pick up the red on the giant stamp blocks and red heart on the large tag behind us.  I wouldnt normally use these colours together but I do like them on the page.

The photo is mounted onto Real Red card which has been punched all the way round with the Scalloped Trim Border and Corner Punches.  I created a pocket using foam pads around the sides and bottom edges to give a deep layer to slot the convention programme into.  Then I used the punches on a thin strip of card, secured it to the side and laced some Real Red 1/8 Taffeta Ribbon through the scallops.  The ends were just tied in a bow to finish.

We were given name badges to wear at Convention and I really wanted to keep it safe - so I tied a piece of red ribbon through the fastener and glued it to the front of the programme.

Whilst we were there, we had the opportunity to buy a lovely stamp called "Love What You Do".  You can see it here as I stamped it in Elegant Eggplant ink onto the base card - it is so sweet!!!

Hope you like my scrapbook page - I do enjoy doing them but dont like having my picture taken, so its not that often that I get nice photos to scrapbook.

Thanks for stopping by - its over to Joannes blog now - just click here.  Have a great weekend!!!

Jan

Gents Birthday Card


Hope you are all getting back to normal after all the snow!?  Ours is melting now (thankfully - I am so fed up of it now). 

Have you been watching Corrie this week - OMG its been amazing.  I cant believe that last nights episode was live - no mistakes, brilliant planning and totally gripping. 

Trouble is, I havent done any crafting this week (sorry!) so I have just been looking through my photos and came across a card a made a few weeks ago and realised that I had forgotten to post it on my blog - Oops!


I made it in November - a mad month in our family for birthdays - for my brother in law and it was a really quick card to make.  The beer glass was stamped twice in Stayzon onto Whisper White card and then one of them was coloured it in using my markers and punched out using my 1 1/4" square punch. 

Part of the froth was cut off when I punched it out so I cut off the froth of the other image and mounted it on dimentionals directly over the top. This was matted onto some So Saffron card which had been punched out using my 1 3/8" square punch.

I stamped the "Cheers to You!" onto Whisper White card, punched it out and again matted it onto So Saffron Cardstock. 

The Designer Series Paper is called Blueberry Crisp and its gorgeous isnt it?!  I just cut out four squares and mounted them onto So Saffron cardstock just leaving a tiny border and matted the layers onto Not Quite Navy card and thats it - done.

Well, I need to go and get cracking now - I must do some christmas cards, otherwise I will have to go and buy some (aaaaahhh!).

Thanks for calling!
Jan
X

Saturday 4 December 2010

Painful week and not just with the snow...

Hi everyone!

Its been such a hard time for everyone this week with the snow hasnt it?!  It took me nearly 3 hours to get into work on Tuesday and have been snowed in since Wednesday.  Luckily I can work from home though so I have been nice and warm, watching all the snow.

I have also been in quite a bit of discomfort this week as I had a nail treatment which caused me to have an alergic reaction and i ended up with blisters under my finger nails (I know, yuk!) but the worst of the pain is over now.

Anyway, heres a photo of one of the Christmas cards that I made recently.

I used one of the baubles form the Tree Trimmings stamp set to make the snowflake.  The bauble was stamped out six times in Real Red ink onto Very Vanilla cardstock and tiny drops of glue was added along with red glitter.  Once the glue was dry, I cut each one out and put to one site.

After punching out some flowers using the Boho Flowers Punch in Old Olive and Real Red cardstock, I glued the six baubles to a large Old Olive flower to help me space them evenly.  Then I put two smaller Real Red flowers on top, offsetting them. 

To finish the snowflake off I put a large brad from the Hodgepodge Hardware set in the centre and mounted the whole thing onto a die cut mat of Very Vanilla cardstock.

This was then mounted onto mats of Real Red cardstock, Old Olive Deigner Series Paper (retired) and then onto a 5" square card blank.

Hope you are coping ok with all the snow and thank you for bobing over to see my blog.

Jan

Saturday 27 November 2010

Barnsley Crop

I have decided to start a crop in our local community centre and here are the details!

When?   8th January 2011

Time?   10am til 1pm

Where?  Doghill Community Centre, Shafton, Barnsley, South Yorkshire

What?  Crafting crop, scrapbooking, cardmaking, anything goes! 

Cost? The cost of room hire will be divided by the number of people who come - the more the merrier cheaper!
Tea and coffee provided.

What else?
Technique classes. 
Totally optional papercrafting sessions on different techniques each month.


Come and join us for a chance to craft with likeminded crafty people! 
If you need more information or directions, please contact me
Jan
X

Thank You Cards for my Lovely Ladies

I have been really brave and using my Designer Series Papers lately!  I am terrible for just looking and stroking the papers, but forced myself to cut it again!

Heres one of the Thank You cards I made for the guests who came to my workshop the other week.

One of the products we saw demonstrated at Convention was the Quick Accents - and, as normal, I had to have some when I come back! 

The scalloped edge is part of the Nursery Suite Quick Accents set and is a die cut strip of self adhesive paper which is fab for quick makes.   Theres lots of strips on one of the 12 x 12" sheets and die cut ovals/circles on the other.

Heres another card using the same sets but giving a different look - just shows how versatile the sets are!


Recipe
Cardstock - So Saffron, Early Expresso, Whisper White
Stamp set - Perfect Punches
Ink - Early Expresso
Designer Series Paper - Nursery Suite
Accessories - Early Expresss Satin Ribbon, Scallop Oval Extra Large Punch, Eyelett Border Punch, Nursery Suite Quick Accents

Hope your having a great weekend?
Jan
X

Wednesday 24 November 2010

Hubby's Birthday Card

Hello!

It was my lovely hubby's birthday last week and heres the card I made for him.


I used the masking technique to stamp the row of  beer glasses (from the Cheers to You stamp set) onto Watercolour Paper and used my inkpads and aqua painters to colour them in.  The Watercolour Paper is lovely and thick (you can certainly see the quality) and its a creamy/off white colour with a lovely texture

To add dimention onto the froth on the glasses I stamped extra images of the glasses out onto Whisper White cardstock and just cut out the froth.  I mounted these over the ones on the watercolour paper using dimentionals and then covered the froth in Chrystal Effects.

The sentiment is from Perfect Punches and all I did was stamp the image in Night of Navy ink onto whisper white card and then trim it using the oval outline of the image as a guide (I made sure there was no white outline).  This was then mounted onto Night of Navy card which was punched out using the Oval Extra Large punch.

To assemble the card I put silver brads in each corner, wrapped Night of Navy 5/8" Grosgrain Ribbon around the watercolour paper and mounted onto a Night of Navy card blank.  The sentiment was positioned on the ribbon and thats it - done!!

He loved the card, but I think the meal at our favourate restaurant in Wakefield went down a bit better!!

Recipe
Ink - Basic Gray, So Saffron, Pumkin Pie, Night of Navy
Cardstock - Watercolour Paper, Night of Navy, Whisper White
Stamp sets - Cheers to You, Perfect Punches
Accessories - Silver brads, 5/8" Grosgrain Night of Navy ribbon, Chrystal Effects, Oval Extra Large punch, aqua painter.
Jan
X

Sunday 21 November 2010

Saturdays Class

Hi there!

Hope you have had a nice weekend - dont they go quick though?  I am sure they lasted longer than this when I was younger.

I held a class on Saturday, and it was the first one for a while so I was a little nervous.  It was a class to show how to get the most out of using the stampin around wheels.  All the ladies who came have bought wheels before but havent really used them that much.

We did basic 'wheeling', making backing paper (we made a One Sheet Wonder) and making borders with mitred corners - and the ladies did really well!

Heres a picture of the cards we made (we did over run a little but they will be able to make many more cards later with the extra cardstock. 


Hope you all enjoyed it ladies? 

Recipe;
Cardstock - Bashfull Blue, Marina Mist, Whisper White and Real Red
Stamps - Sparkly and Bright, Serene Smowflakes, Contempo Christmas
Wheels - Sparkling and Contempo (the ladies also used some of their own wheels in the class for their cards)
Ink - Versamark, Marina Mist, Bashfull Blue, Pacific Point, Real Red and Old Olive
Punches - 1/1/4" circle, Scalloped Circle, Extra Large Ornament, Scallop Trim Border, Modern Label Extra Large and Oval Extra Large.
Accessories - Old Olive and Real Red Satin Ribbin, Silver elastic thread, Light Blue and Dazzling Diamonds Glitter and Silver Embossing powder

Just about recovered now I think!  Will post some of the recent birthday cards I made last week over the next few days so bob back if you get a chance.

Jan
X

Tuesday 16 November 2010

Good afternoon!

I thought I would post the instructiond for making the little box I demo-ed at last weeks workshop.  If I leave it much later I will forget!  Anyway, here goes.

The idea was to show how to make a really simple box for an unusual shaped gift.  It isnt very strong so would only really be suitable for a small, light item, but is SO simple to make.

Measure your item, here we used a standard wheel, and used the SU grid paper as a really quick guide.  The widest part of the wheel was just over 6cm so we used 6.5cm as our measurement.

Cut two strips of A4 cardstock 6.5 cm wide (you need to cut lengthwise) and score the first one at 1cm, 7.5, 14 and 20.5cm cut off the card just after this scoreline.  Fold and crease all the scorelines to give crisp corners and then use a strong glue to secure.


This will give you the inside of the box.


The second strip is going to sit outside the first, so you repeat the scoring above, but before you actually score the card, add one mm to allow the card to 'wrap around' the first strip (hope that makes sence?).  Here is the second strip, attached around the first.

Then you just decorate the box however you like, here I just used my Scallop Trim Border on the front flap, a strip of DSP and ribbon.


Hope the instructions are clear and straight forward to follow.  If you have any questions, please email me.

Recipe
Cardstock - Cherry Cobler
DSP - Jolly Holiday
Accessories - Scalloped Trim Border, Old Olive Satin Ribbon

Sunday 14 November 2010

Workshop Projects

Hi there!

I had a brilliant workshop on Thursday and thought I would share the make and take and Hostess demonstration projects.  The weather was atrocious and there was only a few of us there but it went really well and the Hostess got a free Level 1 Hostess Set plus £25 in freebies!!!

Here is the make and take everyone made.
The card was made using some of the items in the Christmas Bundle offer - Delightful Decorations and the Bauble Punch - more details here.

A 2" strip of Jolly Holliday DSP was adhered to the front of a C6 card blank then I punched out a bauble using the Bauble Punch at one end of the card blank.  A small piece of the same DSP was secured to the inside of the card (this was lined up with the paper on the outside so the patern looked continuous when the card was closed).  You dont have to do this but it did look nice.

We stamped two baubles from the Delightful Decorations set - one in Old Olive, the other in Cherry Cobbler.  These were cut out without leaving any outline and glued, back to back with a length of embroidery thread in between.

A peice of Old Olive was card was punched with the Bauble Punch and the embroidery thread with the baubles positioned so they would sit inside and move freely.  Sticky strip was used to secure the thread to the Old Olive card and a basic rhinestone stuck to each side of the bauble. A strip of Old Olive Satin Ribbon was attached to the top part of the Old Olive card and this was then lined up over the punched out bauble on the card blank and adhered.

Once the card has been written and is ready to send all you do is twist the baubles on the thread a few times and put inside an envelope.  When the recipient takes the card out of the envelope and opens the card, the tension on the emproidery thread will make the bauble spin!

I also demonstrated how to make this really cute box but will post some instructions later on how to make this - I have some serious cardmaking to do today.  Why do we have so many birthdays in November in our family!?
Recipe
Carstock - Cherry Cobbler, Old Olive and Very Vanilla
Stamp Set - Delightful Decorations, Perfect Punches
DSP - Jolly Holiday
Ink - Old Olive and Cherry Cobbler
Punches - Bauble and Scallop Trim Border
Accessories - Old Olive Satin Ribbon, Basic Rhinestones

Enjoy the rest of your weekend and thanks for taking the time to visit.
Jan
X

Tuesday 9 November 2010

Stampers 10 Club

Hi there!

I am starting the next Stampers 10 Club this week and have some slots availailable!!!

All the details for the club are here. But basically, if you commit to ordering £15 per month (plus delivery) in products for the next 10 months, you will get the choice of a free stamp set plus £15 in free items during one of the 10 months the club is running. 

The slot for this month has already been taken, but you will have a choice of months when you agree to joining.  The club starts at the end of this week, so please email me ASAP if you are interested in joining!

Jan
X

Monday 8 November 2010

Cats & Dogs (and not just the weather today!)

The weather today is horrible isnt it?!

I thought I would post the pictures of my own Convention swaps today.  The set I used is called Long Fellows and I had one of those "oh, I have to have that set" moments when I first saw the new catalogue.

When I was thinking of what to make for my Convention swaps I couldnt decide wether to use the cat or dog image from this Level 2 Hostess Set.  In the end I used them both so people could decide which one they wanted.  They went down a storm and I even had a couple of people come to find me to swap (not easy when there are hundreds of people in the room!!

Heres the cat (which seemed more popular than the dog for some reason?)


And heres the dog.

I used the P is for Paw wheel on Whisper White card, trimmed this down to 3" square and matted onto a 4" square of Basic Black card. 

Then I punched out the sentiment using the word window punch and put to one side to be used later.  The cats and dogs were then water coloured using reinkers and aqua paint brushes and cut out really close to the image.

Once I had cut them all out I put them through my crimper.  Not only did this shorten them and give great texture, but I noticed that they could then be curved - so they ended up in lots of different positions!

Heres a few of them all ready to be swapped


As you can see the cats & dogs were then mounted along with the sentiment onto the card

Recipe

Stamps - Long Fellows, P is for Paw Wheel
Cardstock - Basic Black, Basic Gray (Textured), Whisper White
Ink - Basic Gray
Reinkers - Pumpkin Pie (cat), So Saffron (dog)
Punches - Word Window, Modern Label Extra Large, Photo Corners
Accessories - Aqua Painter & Crimper


The swaps I receieved back are beautiful and some of them must have taken hours to make.  So a massive THANK YOU to every one - I cant wait to show them to my lovely ladies.

Hope you have a great day!
Jan
X

Sunday 7 November 2010

More Convention Pics

As promised, here are some more photos of the Annual Stampin' Up! European Convention.  It was held at Addington Palace which is a stunning venue near London.

Swapping on the coach from the hotel to the venue.


Here are the banners on the approach to the Palace.


Addington Palace is a beautiful building (sorry, I was so engrossed in all the excitement, I forgot to take any photos of the inside of the building!).


Entrance to the event.

Queing to register took a while, but we did meet Blackie the Palace cat, who was so freindly - and not a bit daunted by all the people there.  I made a little tag for my bag using some feathers (we all got a free 'laptop' style bag) and made tags so we could easily see which was our own bag).  Blackie wanted to keep it so I had to wressle it away which was hilarious!

Here we are queing to pick up our bags --- which had our two free stamp sets inside!!!
The main hall was inside a massive marque in the grounds of the palace.  The lighting in the marque made the photos really dark so I havent got many pics of the classes or make and takes that I can post here.  This is one of the few decent ones - with Monica and Paula dancing.  How Paula did this in her massively high heels I have no idea!


There was so much crammed in to the event we didnt get any time to really relax other than the awards night on Friday when we all dressed up in our posh frocks. 

Sara's and my upline, Joanne Friend, got to go up on stage to pick up her award for Demonstrator of the Year and also got a free stamp set plus a pack of Designer Series Paper during Prize Patrol - names are put up on screen and you have to check the screens to see if your name comes up then stand up and clap.  Well done Joanne!

There was lots and lots of swapping with UK, German and French Demonstrators.  The ideas and inspiration from everyone will definately keep me inspired until the next Convention!

And what else can I tell you about Convention? 

Well, there were a few announcements including -
- information about NEXT YEARS Convention.  Its at Disneyland, Paris (wooohooo!!!) in November.
- details of the absolutley GORGIOUS Sale-A-Bration promotion which is on in January & Feb 2011.
- info on an eagerly awaited item coming in the Mini Catalogue in April 2011.
And we also got an additional FREE stamp set (yes, we ALL got one).

Sorry, but I cant share the Sale-A-Bration info until it is officially announced, only demos at the convention have been given the details.  No other demos have the info, even those in the US!

When I originally became a Demo, I would never have dreampt that everything I was told about Stampin' Up! was true - but it is.  The benefits of being a demonstrator are absolutely incredible, I never intended to run my own business when I became a demo (all I wanted was the discounted products!).  But the training, support, free/discounted products and exclusive previews of new items, quickly encouraged me to try and I feel so privilidged to be part of such a fantastic company.

Thanks for bobing over to see me!  I will put some pictures of the swaps on my blog in the next few days.

Jan X

Saturday 6 November 2010

Convention Crazy

 O.M.G. - Convention is MEGGA!!
We have coaches taking us from the hotel to the venue and big banners are placed on the access to the Palace so we couldnt miss the venue.


Here is the stage.


Its my first convention and its been fab so far.  Manic swapping, cueing, shopping and basically a brilliant time.  Sorry, but am having problems with my blog and uploading pics, so will put more photos on soon.

The hotel has been ok, well - apart from them not quite being prepared for hundreds of hungery crafters wanting to have breakfast before the coaches leave.  Oh, and the keys not working for our hotel rooms when we needed to get ready for the awards night!

Anyway, here is the biggest bed I think I have ever seen - it is humongous...

And as its a bit late now, I think I need to get in it - lots more crafting tomorrow!

Thanks for stopping by.
Jan
x
Here we are swapping on the coach to the venue.

Monday 1 November 2010

Bundle Up for Christmas!


This Christmas season get an exclusive package of ribbon for FREE when you purchase a Christmas gift-giving bundle!
Gifted Bundle

                                           Wood-Mount Price     Clear-Mount Price
Gifted Set and
Jolly Holiday Designer
Series Paper                           £35.70                      £30.70

Welcome Christmas Bundle

                                               Wood-Mount Price       Clear-Mount Price
Welcome Christmas Set and
Christmas Cocoa Specialty
Designer Series Paper                 £36.90                             £31.90


Season of Joy Bundle
Season of Joy Set and
So Swirly Stampin’
Around Wheel                             £36.45

Delightful Decorations Bundle
Delightful Decorations Set and
Ornament Punch                          £37.45


Choose from these FREE ribbons:

Mistletoe Ribbon Originals (Retail Value £11.50)
Sleigh Bells Ribbon (Retail Value £8.50)
Riding Hood Red 1-1/4” Striped Grosgrain Ribbon (Retail Value £10.25)
Real Red 3/4” Polka-Dot Grosgrain Ribbon (Retail Value £10.25)

*Bundles and ribbons available while supplies last

Saturday 30 October 2010

I am still here... honest!

I know - I havent been posting lately.  I am so sorry, but I have had lots of things to do for Convention lately - have I mentioned that I am going to the Stampin' Up! Convention?

As the items I have been making will be used to swap with some of the other demonstrators, I am not going to post full pictures and recipes for them until next weekend - I dont want to spoil the surprise.  But here are a few sneeky picks.

This is part of one of 90 Convention Memory Card Swaps - yes, 90!! 

When we come home we should all have one of these from each of the 90 ladies involved in the swap so I am going to make a mini book as a special momento of the event.  Its going to be interesting finding the 90 ladies involved when there are about 300 going to Convention isnt it?!

This little sweety is so cute.  I just had to have this stamp set!!!  The picture is part of one of the general ones for swapping and I have made 70 of these, so I should come back with lots of ideas and samples to show at my workshops and classes. 

Not sure if I will get any more crafting done before I go - Ooooh I cant wait!!!  Hope you have a great weekend.  Off to make my list for things I have to remember to take...

Jan

Ps.  Dont worry about Mrs Miggins whilst I am away, My hubby will be making sure she's OK - Bless him!!!

Monday 18 October 2010

New Display Book!

Heres a few pictures of my new Display Book.


The Designer Series Paper Stacks now come in colour families instead of single colours so you get much more of a choice of coordinating colours than before.  Here are a couple of the other Designer Series Paper packs, each page shows the paterns within the pack and as you can see they are just scrummy.


Here are some of the ribbons!  They are so scrummy and as always, they match the cardstock and papers perfectly.


And just look at these buttons!


I cant wait to show people the book which is designed so you can see the products in real life instead of just looking at a caalogue.  I cant wait for my next workshop now!!

Thanks for taking the time to visit my blog.  If you want to book a workshop (its worth it just to drool over the Display Book - lol) contact me ASAP

Jan
x

Megga Week

Oh, My, Goodness - I have had such an exciting week!

On Thursday, I met up with my Uplines, Sara and Joanne and we shared out samples of the lurvely Designer Series Paper.

Then on Saturday, I met with some other lovely demonstrators and we had a massive share of the new papers, ribbons, brads, buttons and flowers.  Each of us bought a similar amount of new products from a set list, then we all shared everything between us.  The amazing Amanda organised everything, including a display book and lunch for the share! I will put some photos of my Display Book on my blog this evening as I have to go to work now!
For both meets I made this card front using all new products from the new catalogue.  Sorry, but I am not sure if any of the items I recieved in return are being used for other swaps but I will post them at a later date.


Recipe
Stamp set; Wedding Sweet
Cardstock: Shimmery White, Pink Pirouette, Concord Crush, Wild Wasabi
Ink; Concord Crush
Markers; Pink Pirouette & Wild Wasabi
Accessories; Basic Pearls, Paper Piercer
Punches - Scallop Trim Border Oval Extra Large & Designer Label

Thanks for stopping by!
Jan
X

Friday 8 October 2010

Contempo Christmas

How quick is this year going?!

I havent had any time to craft this week (again) - other than getting some swaps ready for the Stampin' Up! Convention in November.  Have I told you I am going to Convention? LOL!!

Here is the make and take we made at the SU training evening in Sheffield the other week.  The new Large Ornament Punch is fab - and there are lots of uses for it too.  I have seen some gorgeous punch art using it so will have to get my finger out to show you what can be done with it!


The ribbon is lovely and soft and hangs beautifully on the card - I NEED to get some more of this!

The bauble image was stamped onto Whisper White cardstock 3 times and punched out with the Large Ornament Punch.  Each was scored down the centre, folded and then the edges secured to each other before sticking on the card blank.  This looks great and folds flat to post too!!!

If you would like the recipe for this card, please email me and I will give you all the instructions.

Have a great weekend!  Hopefully I will get some crafting done soon.
Jan

Sunday 3 October 2010

Wow - what a party!!!

Oh - My - Word.  What a manic party we had yesterday!! 

I held my New Catalogue Launch Party yesterday morning and it was unbelievable - everyone came at 10am so the house was buzzing.  I sold lots of my retiring stuff (not all unfortunatley) but I just have to hide it and pretend that I did (shhhh!).  So just putting in a LOVELY big order for new stash for me and the ladies who came.

One thing that did come to light was that our house really isnt big enough so we do have to move (thats my excuse anyway).  Otherwise, next year I will hold 2 events - one to sell old stuff and a separate Launch Party on a different day.  Not that I want to still have the house on the market next year (I have set my heart on a house nearby with a massive garage CRAFT ROOM!).

I didnt take any photos unfortunately, in fact I didnt even have the time to make a cuppa!  But I would like to thank the following ladies for taking the time out of their busy weekend to come to the party.

Suzanne, Sophia, Abby, Anne, Kim, Jean, Julie, Lynne, Jean, Val, My Mum (June to everyone else) and Kath.  Thanks for making it a FAB PARTY!

Just one more thing before I go.  I am starting a Stampers 10 Group in either November/December and have six places left available.  Here are the details for how it works.

Off to chill out now.  Hope you have a fab weekend!
Jan
x

Friday 1 October 2010

New Catalogue Launch Party

Its here!

The new Stampin' Up 2010-2011 New Ideas Book and Catalogue is available now. Yey!!!  Its a big file so takes a while to download - but its worth it!

As demonstrators we got to see the new catalogue at the begining of September, and its been soooo hard not letting everyone see how good it is.

I am having a party tomorrow so all my friends and regular customers can see some of the new products including the new colours, clear mount stamps, Colour Coach etc.  Here is the invitation I sent to them.


As I wanted to show them some of the gorgeous new colours I used Marina Mist, Cajun Craze and Crumb Cake.  Now, you will probably look at this combination and think 'I would never have put these colours together'.  But the new Colour Coach takes lots of the hard work out of choosing colours as it has examples of colours which work really well together.

I would also like to invite anyone else who wants to look at the new stuff to come to the party. My friends and regular customers are having the first look - so this invitation is for you to come between 11am and 2pm. Please contact me so I can give you directions to the party!


Recipe
Cardstock - Cajun Craze, Marina Mist and Crumb Cake
Ink - Cajun Craze and Marina Mist
Stamp sets - Vintage Vogue, Sincere Salutations, Tiny Tags
Accessories - Two Step Bird Punch, Medium Jewelry Tag Punch, Linen Thread

I will post some pictures soon of the swaps from a Stampin' Up! training event I went to in Manchester recently so you can see the amazing work of some of the other Demonstrators.

Hope to see you in Saturday, dont forget to contact me for details!!!!
Jan
X

Saturday 25 September 2010

Stitched Felt & Rub-Ons for Megga Quick Cards

These have got to be the fastest cards I have EVER made!

The stitched felt and DSP are retiring at the end of September -and boy do I wish I had used them earlier!  They are so sweet.

All the cards were made in 40 minutes - in fact the to attach the flowers and leaves took longer to dry than making the cards!

This one is definately my favourate.


These rub ons are amazing! I have mentioned before that I was dubious as ones I cheaper ones have used before never really transfered properly.  But these gave  perfectly clear and crisp finish.


The stems of the flowers are just thin strips of Old Olive cardstock attached behind the flower and the leaves but looks really effective.  The little button on the ribbon is also from the Sweet Pea Stitched Felt set.


I have also been making some cards using the BRAND NEW stamp sets from the new catalogue, but unfortunately, I cant show you them until after the 1st October!  Just wait until you see the new stamps - I am sooooo excited about them, especially the clear mount ones.

Recipe
Cardstock - Kraft (renamed to Crumb Cake) and Chocolate Chip
Designer Series Paper - Sweet Pea
Images - Rub Ons, Cherished Memories
Accessories - Regal Rose 5/8 Grosgrain Ribbon, Old Olive Satin Ribbon

Thursday 23 September 2010

More Pictures of Birdies

Good morning!

I promised on Monday to show you the other cards I made at the weekend using the Sweet Pea DSP.

Here they are...


I used the scalloped sqare punch at an angle for the sentiment and then mounted on a piece of Taken With Teal cardstock (I love this colour - cant believe its retiring next week!!!).  I then secured them with a brad from the Pretties Kit.  As in Mondays post, I covered the central bird images with Chrystal Effects and mounted on Dimensionals.

For this card all I did was use the DSP, mounted onto Chocolate Chip cardstock and used punched shapes to decorate and for the sentiment. 

Recipe

Cardstock - Taken With Teal, Chocolate Chip, Whisper White
Stampset - Sincere Salutations
Accessories - Crystal Effects, Brad (Pretties Kit)
Punches - Large Oval, Large Scalloped Oval, Scalloped Square


Thanks for stopping by.  I will be having my Open Day next Saturday (2nd October) so if you fancy bagging a bargain and the chance to get some free products from the new catalogue, please contact me ASAP.  Its going to be a busy day so book your place to make sure you get a seat!

Jan
X

Monday 20 September 2010

Happy Monday!

Hi everyone!

Hope you are all raring to go for another week?

I had a lovely weekend and got round to making a few cards for a change! I even managed to use some of my Sweet Pea Designer Series Paper - for some reason I end up looking at the gorgeous DSP Stampin' Up! do but just cant bring myself to use it!!!


This was such a quick and easy card to make.  I trimmed a piece of DSP to mount onto a layer of Taken With Teal cardstock then used my Crop-a-dile to secure a couple of Jumbo Eyelets onto one side.  A knot was tied in a short length of Chocolate Chip 5/8 Grosgrain ribbon which was then treaded through the eyelets.

The two birds in the middle of the card were cut out of a sheet of DSP, covered in Crystal Effects and then when dry, mounted on Dimentionals. 

Wish I knew why I struggle to use DSP, the only reason I can think of is that its so nice I dont want to make any mistakes!  I really must try harder...

Recipe
Cardstock - Taken With Teal, Chocolate Chip, Whisper White
Stampset - Sincere Salutations
Accessories - Jumbo Eyelets, 5/8 Chocolate Chip Grosgrain Ribbon, Crystal Effects
Punches - Large Oval, Large Scalloped Oval

Will post more pics of the other cards I made over the weekend later,  off to get some work done now - busy week ahead!

Jan X

Sunday 19 September 2010

Even More Price Reductions and New Catalogue Launch!!!

We have the new Stampin' Up Ideas Book and Catalogue 2010 - 2011 coming out on the 1st October and on the 1st September they released a Last Chance List for items which are retiring. 

We have just been issued with an updated list of items which are even further reduced - some of the full sized ink pads are now reduced to £2.13 each - and if you have seen the size and design of these ink pads you will know how good a deal this is!!!

Click here for the new list.

This items on the list wont be in the new catalogue but some items like punches will be "reconfigured" (ie. manufactured/packaged a little differently).

Sold out items as of 19/09/2010
  • Darling Dots
  • Out of the Box
  • Old Fashioned Christmas
  • A Tree for all Seasons
  • Close to Cocoa Cardstock
  • Creamy Caramel Cardstock
  • Blush Blossom Cardstock
  • Sage Shadow Cardstock
  • Kraft cardstock (12" x 12")
  • Very Vanilla cardstock (12" x 12")
  • Bridesmaid Specialty Paper
  • Playground Designer Buttons
  • Studio Sketches
  • Autumn Meadows DSP
  • Large Oval Punch
Items are selling out very fast now so you need to email me ASAP if there is anything you would like to order!

Also, whilst you are looking for a bargain, I will be have a huge sale of my discontinued Stampin' Up! items on the 2nd October during my New Catalague Launch Party.  Please let me know if you want to come over for a look at some of the new clear mount stamps, new colours of cardstock/inks, Designer Series Paper and the opportunity to get free products from the new catalogue.  I will also be staring another Stampers 10 group and will be offering those attending the party the first pick of the places.
Have a fab weekend
Jan

Sunday 12 September 2010

Stampettes Training Evening

Hi there!

Thanks for bobbing over to see me - I know, I have been naughty and not been posting much lately.  But that will change soon - as I have my hands on some new goodies AND THEY ARE FANTASTIC! 

As a SU demo we get the chance to see - and play - with some of the new products in the 2010-2011 Ideas Book and Catalogue before customers see them.  And boy, have I been playing...

When the new stuff came the other day I was in awe.  I just couldnt bring myself to open the new colours of ink pads & card - plus the new stamps... That didnt last too long though as I had planned to pop round to Saras for a training night and we had a fab time playing.  Sorry, I cant show you the new stuff - otherwise I would have to shoot you!  But if you want to book a workshop or come to my next class - I may just let you have a peek! 

Here is one of the cards we made - plus its matching bookmark!


Sara has the details here if you would like more info on the card, I must say - I love the bookmark.  Its so nice to think that there is something useful that can be kept after sending a card to someone special.


I have also been making some swaps for a Stampin' Up! training night in Manchester in a couple of weeks time.  Its a great idea - everyone makes a number of the same card and when we meet up we all swap them.  This means that we end up coming home with loads of samples of other peoples ideas.  Again, as the ones I have made are using new colours and stamp sets, I cant post a picture yet, but they will be posted after the 1st October, I promise.

Dont forget, there is still time to order from the SU Last Chance List - stocks are dwindling fast so if you want to bag a bargain you need to be quick.  Here are the items that have sold out since the 1st Sept:

Darling Dots
Old Fashioned Christmas
Close to Cocoa Cardstock
Creamy Caramel Cardstock
Sage Shadow Cardstock
Studio Sketches
Autumn Meadows DSP

Thats it, they have gone, so dont miss out email me if you would like to place an order.

Jan X